Friday, August 20, 2010

Very Big Week

Monday was sandblasting and paint day.
Sandblasting, on my fun shit-o-meter, is around a negative 5, just above going to the dentist for a root canal, but it went well.
The paint is a flat black spray can combination primer/paint that coated nicely and covered with only 3 applications. Tuesday was drying day.

Newly painted and sandblasted pier and wedge.

Jim arrived on Tuesday afternoon bringing all kinds of goodies with him including the CCD camera and it's manual, Photoshop 8, Photoshop Astronomy and a DVD astronomy course from the University of California, Berkeley entitled
Understanding the Universe.
He had told me last week how large the camera manual was, and I have to say the man does not exaggerate. The damn thing is huge. Watch for a separate blog posting on the camera later.
Earlier, I had also test fitted the wedge base plate to the bottom of the telescope and then packed the scope back into the shipping box for the last 3 mile trip to it's new home and I put up a set of scaffolding in the newly cleaned observatory.
Wednesday Jim was all fired up to mount the scope so we started by putting up the second set of scaffolding and then planking across the back of both scaffolds.
Then a trip out to the storage building for the telescope box and the wedge. When we got back to the observatory we placed the scope box on the rear planking and the wedge under the right set of scaffolding.
On the second trip we hauled the steel pier over, carried it in and installed it to the concrete pier. We then leveled it and tightened down the 3/4 inch anchor bolts.
On our third trip we picked up Jim's wife Michelle and headed into Grand Marais for lunch and 10 bags of sand to fill the steel pier, a must to deaden any ringing vibration if the pier is bumped. On the way back Jim asked Michelle if she would help us out and the three of us now had some heavy work to get done.
Filling the pier with sand was no big deal but lifting the 168 pound wedge from the floor to the top of the 6' tall pier hurt pretty good and we still had to lift the man killer telescope. It was even difficult getting the lid off the scope box inside the observatory with such limited room! With Michelle on a step ladder where she could see the bolt holes, we made the big lift and got the center bolt started, the other three bolts went right in and we then celebrated with Advil all around!


It was nice just to sit and look over all this hard work coming together.

Sunday, August 15, 2010

Lots of Things Coming Together

Jim's been doing research and ordered the CCD camera, auto focuser and filters, and some of the items are being custom made to eliminate clearance issues.
The CCD camera has arrived and Jim is bringing it when they come up on Tuesday, I can't wait! The auto focuser is still a week or two away. Jim also mentioned that he had printed the CCD camera manual, a large three ring binder with 12 tabs. He's thinking it might be complicated, so do I.
The steel pier and wedge is back at the storage building and will get sandblasted and painted tomorrow. I had hoped to be done with this job, but the humidity has been very high making this kind of work next to impossible.

The heated control room building design is now final, I've done a lot of image searching on goggle for unusual small building and my favorite came on the Dr. Seuss Playhouse search.

Here is the link where I found it,
"The playhouse was designed and built by Rohan Goel, for his IB project and then raffled off"

I did build a small model to see if it scaled up larger without losing it's charm and it does work out just fine, construction will begin at the end of the month.
More planting this weekend when Pat was up, she has the grounds looking great, everything growing nicely including the grass and so far only 2 plants that our local deer, Bucky, just had to eat.

We are also looking into a set of tracks from American Track Truck for winter access to the observatory without spending half our lives plowing snow.
Here's a photo from their site, this system would make the 3 mile trip safe and warm.

Tuesday, August 03, 2010

Visual Learner and Wedge Building

I'm a visual learner so before I can build anything, I need a clear picture in my mind of the item I'm designing.
The process of wedge design was somewhat painful for a few reasons, first I was having trouble seeing the known angle of 47 degrees 44' 22". I just could not work out whether this angle was off the horizontal or vertical, so I had to call in the high paid help again.

Sam Parker is our project surveyor and a bit of an astronomy buff himself and thanks to Sam's help I was able to see it clearly. That man is worth every dime we're spending with his firm.
The second stumbling point was the design itself. A quick Internet search shows great diversity in wedge building, you can pivot the scope mounting plate from the top, middle, bottom or anywhere in between.
I would come up with an idea, let it roll around for a day, then change my mind, then change it again! This went on for weeks and last Friday I decided it had to stop. I made a call to Tom at Last Chance Fabricating asking for some more shop time and he was kind enough to agree. I figured about 8 to 10 hours would cover it and I only missed that time estimate
by 3 days (not bad) .

I started by cutting the base and telescope mounting plate out of 3/4" steel. I then welded 1/2" steel flat stock under the base to hold the bearings in place along with welding the 3/4" shaft on the scope mount

The triangular cantilever support is cut from 1/2" steel plate, heavy 6" square tubing with 8" disks welded to the bottom which will insert into the steel portion of the pier.
This photo shows cardboard patterns, I cut out a few designs before becoming happy with this one.

Installation of the 8" disks and side cut outs, now just need to finish up the welding and grinding.

Top view of the angle adjustment, the telescope mounting plate is trapped between two 1/2" thick pieces of flat stock that are drilled and taped for 3/8" fine threaded cap screws.
This allows for 5 degrees of total movement, that's 2-1/2 degrees both sides of my target setting.

Front view of adjustment screws.

Complete pier ready for sandblasting and paint, total weight around 400 lbs, not including the sand filling after installation. A special thanks again to Tom for the shop time, you can see what he's working on by looking on his blog or web site .

Monday, July 26, 2010

Concrete Day

Well after some thinking I decided not to piggy-back our concrete load, it seemed we would wait at least another week and I was worried about how long the mix might have sat in the truck before delivery.
Ordering a small 1 yard mix costs more but it was in perfect shape when it showed up.
All in all, it cost about $40.00 more then we would have paid doing it ourself and there were no extra trips to town, or buying, loading and mixing, a true no brainier.

It was close, the building height made for very little slope on the trucks shoot so we had to push the concrete down to the pier.


Vibrating 3 times during the fill, we then installed and aligned the top bolt plate. The blue tarp kept the mess to a minimum.


(Click on any photo to see larger view)
Pat's planting looks great, the photo's don't do it justice.. Now it's up to me to water so they get a good start.

Monday, July 19, 2010

Aerial Photo and Some Rock Wall Planting

Pat was up this weekend,
with a car full of plants, dirt and seed which gave her a great start on planting the stone wall.
I'll have photos later.

Jim and Michelle were also here
this weekend and able to take this photo on the flight home,
it's fun to see it from the sky! (That's our dock in the very low left corner.)
Other then that not much work went toward the observatory this week. I've ordered the concrete to pour the pier. I'm trying to piggy back our small 1 yard load with another load being delivered near by to save some money.

Friday, July 09, 2010

Looks Like a National Park

Clean up went very well.

It started with cutting the hillside and collecting rocks, which seem to be as plentiful as trees around here.
I realize this goes against the thermal mass rule, but the berm wouldn't have held up over time. My wife Pat has a knack for planting beautiful rock walls and I'm sure she will have it green by next year.
We will also plant shrubs along the sides of the building, put a wood deck in front and a native grass everywhere else, which should mitigate any thermal trouble.

Here is the final wall with class 5 gravel spread over the road and parking spots.

This wider view shows the fire ring and wood shed. This space will be used when we are not using the observatory. We needed a new fire spot, our old one is in the middle of our building site for the new house.


View driving up the driveway.

The observatory's back, a side parking spot and a rock pad for the warm room. This view is from the northeast corner of the observatory. Next week we'll pour the pier and do the final building leveling. The pier will need some time to cure before we mount the scope.
I'm also running to the cities this weekend to pick up grass seed, shrubs, dirt and plants.

Thursday, July 08, 2010

Tree Killing and Dirt Work

Our tree clearing day ended up being wet. It started raining first thing in the morning and never quit.

Some trees were cut down and their stumps left in the ground, others were pushed down with the hoe and stumps removed.We took a total of 15.

Dean takes great pride in his ability to push trees over, legend has it that a tree kicked the shit out of him when he was young and he's now getting even.

All of the downed trees are stacked on a landing with plenty of room for the fire wood cutter-splitters people to come harvest it for heat.


Next day our dirt work started by leveling off the site, we then started on the pier and did we got lucky, a 7 foot deep hole around here is a lot to ask! Once we got to depth, Doug leveled out 5" of 1-1/2" rock in the bottom.


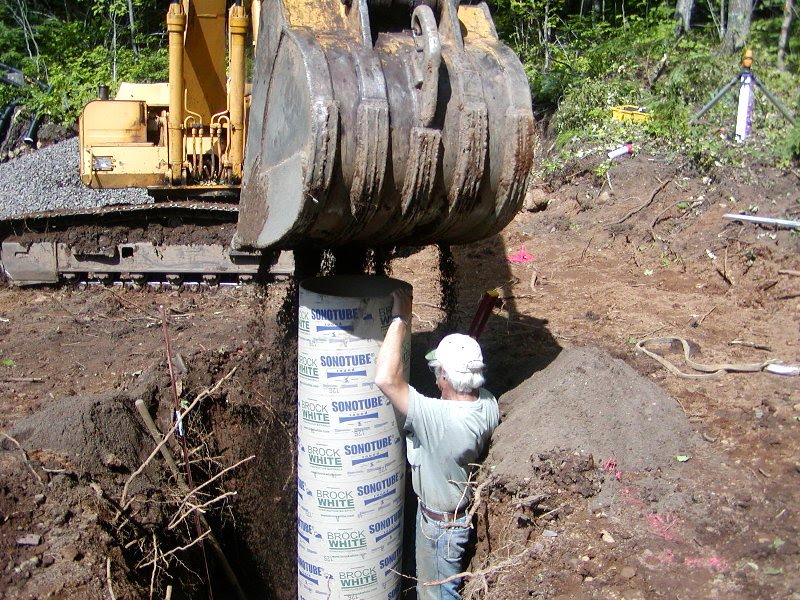
The re-rod cage went in next followed by the sono tube with spread footing attached. Back filling with lifts of sand, we leveled and compacted around the tube working to within 4" of final grade.

For the last 4" we used more of the 1-1/2" rock which will make a great base. One other thing to mention that is not shown in the photo, we braided a good 8' copper ground rod and ran it up the side of the tube.


Home sweet home, the scary part was lifting and pulling the observatory over the tube without smashing or crushing the top of the newly installed tube.


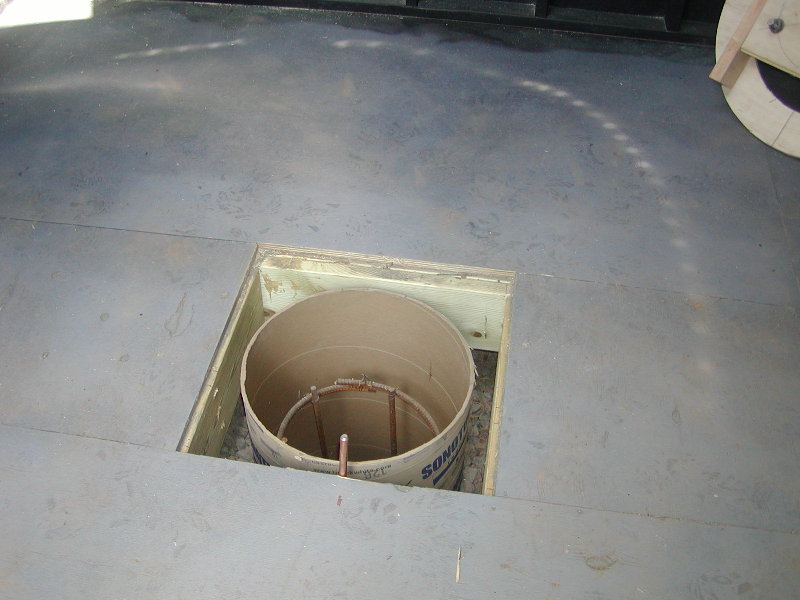
There it is, the pier through the floor with ground rod in the front, we then aligned the building north/south.

Our permanent pier is now established.

N 47 44' 22.3"

W 090 35' 42.8"

Tomorrow is clean up day, as well as site preparation for the warm room.

Monday, July 05, 2010

Big Surprise on Top of Hill

Using a GPS to navigate the thick woods, we punched a 1000 feet trail to the top of the hill and ended up hitting the northwest corner dead on. This corner is the site I had picked and photographed earlier in the blog.
It was the middle of the winter when I picked that site and now it looks entirely different, Dean flattened a small spot so we could evaluate the sky view and amount of trees that would need to be cut down to improve it, we noted:

Evaluation included the following:
1. amount of trees to take down
2. ability to remove wood from the site
3. final view obtained
4. cost to run power
5. accessibility in winter

After spending an hour of looking around, counting trees and shooting compass lines we headed back down the hill looking for a possible site lower down. Ends up the best site we could come up with is 10 feet from where we started the road and 30 feet from where the observatory was unloaded in the first place.
To keep us from feeling like we wasted our time, we tossed around the idea of tapping maple trees and running the tubes down the path to a central collection point, but I'm not putting this idea on the white board just yet.


This is the new site, it was cleared a few years ago for septic work, it has a road, good view, close electric service, and it will be easy to remove the downed wood.
This was the best compromise, far less trees removed and in time we can continue to improve the sky view, I was disappointed at first but getting happier by the minute.